
When placing trad protection in rock climbing, get in the habit of mentally rating your placements.
I first received this advice from Jez at JB Mountain Skills. In his YouTube video, “How to place and judge trad climbing gear including nuts, hexes, and cams,” Jez explains his own system for rating trad gear placements.
Here’s my breakdown of his rating system:
- Just a Joke (If You Look At It Too Long, It’ll Fall Out)
- Not Expecting to Hold A Fall, But There’s a Slim Chance
- Pretty Happy With It, but a Rip Wouldn’t Surprise Me
- Really Flippin’ Good
- Textbook Perfect
I like Jez’s system. But I wanted a scale a little more quantifiable, something I could fall back on (no pun intended) when climbing outside my comfort zone.
So I’d like to share my trad gear placement rating system with you. It’s a habit I quickly got into, and I suggest you do, too. You might come up with your own rating system along the way!
(Here’s JB’s original video, by the way.)
Disclaimer: It’s critical you understand that I’m not a certified Rock or Mountain Guide. I’m just a recreational rock climber with an avid interest in climbing skills and systems. When you climb, you’re taking your own life into your own hands, so everything I’m writing is for exploratory educational purposes only. It’s not a substitute for proper training and teaching.
Getting Started in Trad Climbing
If you’re coming from a sport climbing background, trad climbing may shake you up. You can no longer take fall after fall at the crux of your project, dialing in your beta. You can’t just clip a quickdraw to a beefy ½” bolt in 2.7 seconds. Every trad gear placement is a science project in miniature.
Trad climbing is exponentially more dangerous and difficult than sport climbing, in my opinion. You should be a solid climber with a thorough understanding of single-pitch, single-rope systems before venturing into the trad climbing world.
How to Start Learning Trad Climbing
Trad climbing should be learned on the ground, not the rock.
Unlike in sport climbing, falling is the last resort of trad climbing. Your primary protection is your climbing ability and skill in reading vertical terrain. Downclimb before you whip. Retreat before you need to do either.
- First, climb with a partner who can show you the ropes. Educate yourself by taking classes, reading Mountaineering: Freedom of the Hills, John Long’s Climbing Anchors, AMGA’s Rock Climbing: The AMGA Single Pitch Manual, etc.
- Next, practice your placements at ground level. Weight your placements and find out what holds and what doesn’t.
- Next, rack up and climb a trad route on top rope, but climb with a dummy lead rope, placing protection and clipping in just as if you were leading. If you fall, the top rope system will catch you.
- Finally, begin leading easy 5th class single-pitch routes, even 4th class scrambles. Practice and refine the system before you’re test your skills on real rock.
My Rating System for Trad Climbing
Perhaps you’re comfortable with a simple Good – Better – Best rating system. Personally, I’m not. It’s too vague. It doesn’t give me clues whether to backup, continue, or retreat.
So I have my own 5-point rating system. My personal system is based off what length of fall I think the placement can take.
- Aid – Bodyweight Only
- Poor – No-Slack Falls
- Marginal – Short Lead Falls
- Good – Long Lead Falls
- Bomber – Any Fall
The ratings are based on the strength and security of the placement. In order to achieve a #5 placement, a piece of gear (and the rock it’s in) has to be both incredibly strong and undeniably secure in multiple directions of pull.
Ratings are inherently subjective. The more you know about your gear and the rock, the more accurate your ratings will be.
(1): Aid – Bodyweight Only
At the bottom of the 1-5 scale is the placement rated solely for aid climbing: bodyweight only! (or roughly 1 KN).
These are the placements you gingerly ooze onto when aid climbing. At most, you might do a light bodyweight bounce test.
Examples include:
- Progression pieces of gear like cam hooks and sky hooks
- Micro crack protection (brass nuts) in bad cracks
- Totem cams on two lobes
Bodyweight-only placements are almost exclusive to aid climbing. In regular trad climbing, they should be avoided at all costs. Extreme trad climbers may MacGyver 11-point equalized protection points using bodyweight-only placements, but the rest of us are smart enough to know when to descend.
(2): Poor – No-Slack Falls
Generally, you should not settle for #2 placements. Poor placements are tenuous at best and may not hold any fall of any length. At most, they can be expected to hold top rope falls, but once you climb above the pro and slack enters the system, all bets are off.
These placements should not be expected to hold more than 2-3 kN. Your belayer’s soft catch could easily be the difference between the piece holding or breaking!
Examples include:
- Cams in icy or mossy cracks
- RURPs in soft stone
- That dad-blasted white TriCam (which I’ve never had any luck with)
A #2 placement .. well, it’s better than nothing. If you can place it high above your head, it’ll (hopefully) protect you for several feet. If you can place two or three in the same crack, even better. But honestly, you’re mostly doing it for your peace of mind .
You should never be happy or content with a #2 placement. It’s probably because you either did a bad job, stuck a piece in blind, or you brought the wrong gear for the route.
Knowing whether a Poor placement is an acceptable risk or not requires much more knowledge and experience than 99% of us climbers have. You can probably do better.
(3) Marginal – Short Lead Falls
You should feel confident that a #3 placement will hold you until your next placement 10 feet away. Just … maybe not 20 feet away.
According to Petzl, a short lead fall can easily generate 4-5 kN at the top piece (that’s over 1,000 lbs!). You should expect a Marginal placement to withstand a short lead fall, but if it ripped, that shouldn’t surprise you.
Examples Include:
- Maybe a yellow cam would have fit perfectly, but it’s 40 feet below you. So you resort to the green cam, which is definitely under-cammed.
- Maybe you’re placing a ball nut behind a sandstone flake. You trust the gear, but you doubt if the rock will hold?
- Maybe you place a chock in a slotted crack. You trust the chock to hold a straight downward fall, but you’re concerned an outward pull would tug it out.
#3 placements are probably more common than we’d like. They result from necessary trade-offs between safety and expediency. Many placements might be #4 (Good) in strength but only #3 (Marginal) in security, sometimes due to the rock quality. We can’t all climb on Yosemite granite!
Unfortunately, sometimes #3 placements are all the rock (or your gear) have to offer. So you must weigh the dangers of proceeding versus retreating. In general, the harder the climbing, the more dangerous a #3 Marginal placement becomes.
Linking multiple Marginal placements in series can be deadly. If a single one fails, the rest can easily zipper out (remember, they won’t hold big falls!). You can be 40-50 feet off the ground, but if you’re climbing above a series of #3 placements, a single failure can result in ground fall.
As Neil Chelton says, “Always keep at least two good pieces between you and the hospital!”
In potential ground fall or ledge fall situations, it is critical to double up (or triple up) on Marginal placements for a single piece of protection. Use two chocks instead of one. If you can equalize the two with a Sliding X, great, but if not, at least clip both the draws to the rope as a backup.
P.S. The abundance and variety of modern climbing gear allows the equipped climber to turn many Marginal placements into Good placements. Flared cracks, for instance, can be very well protected with offset nuts, offset cams, or Totem cams.
(4) Good – Long Lead Falls
A #4 placement should be your bread n’ butter. These are as close to textbook placements as possible: an angel-wing cam sunk deep into a granite splitter crack.
Examples include:
- Cams plugged in to clean parallel or slotted cracks within their recommended expansion range.
- Nuts plugged into a crack constriction with maximum surface contact, able to resist an outward pull.
I trust a Good placement to handle any normal lead fall (up to Fall Factor 1.2 or so). It must be able to withstand a wide direction of pull – I shouldn’t feel concerned about exactly where I fall or lean.
With many #4 placements, the rock will break before the gear will! This is where developing an understanding of rock itself becomes very important. For instance, some types of sandstone can lose half their strength when wet. A “bomber” placement in wet sandstone will give you a nasty surprise!
- I look for #4 placements early on in a route, where a gear rip could double a fall factor.
- I also try to place #4 placements between 20 and 40 feet up, where a rip could end in a groundfall.
- And of course, I try to use #4 and #5 placements when building a classic 3-point anchor.
(5) Bomber – Any Length of Fall
Bomber ratings are like your virginity – don’t hand them out to just anyone!
A #5 placement should make you smile ear-to-ear. It’s that prickly feeling of relief that washes over you after a tough series of moves over unprotected terrain. It’s almost like feeling you’re back on solid ground.
A #5 placement should hold a Factor 2 fall. The gear should fail before the placement does. Some #5 placements, such as large trees, even qualify as single-point anchors.
Examples:
- Large tree (6” diameter, rooted and alive)
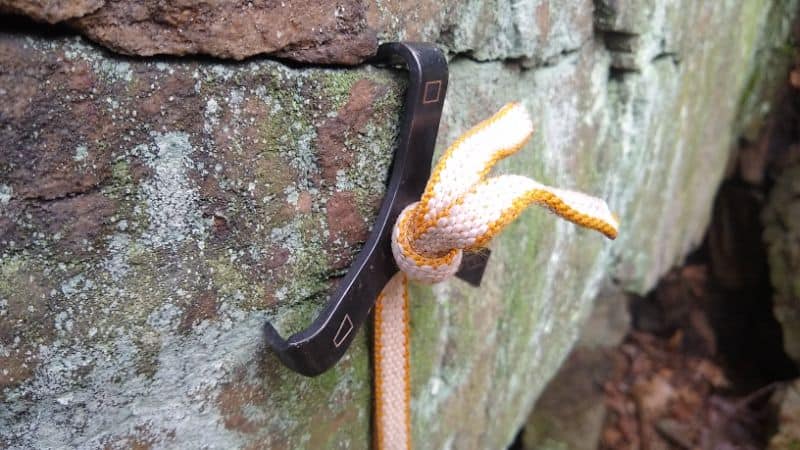
- Stainless steel bolt and hanger
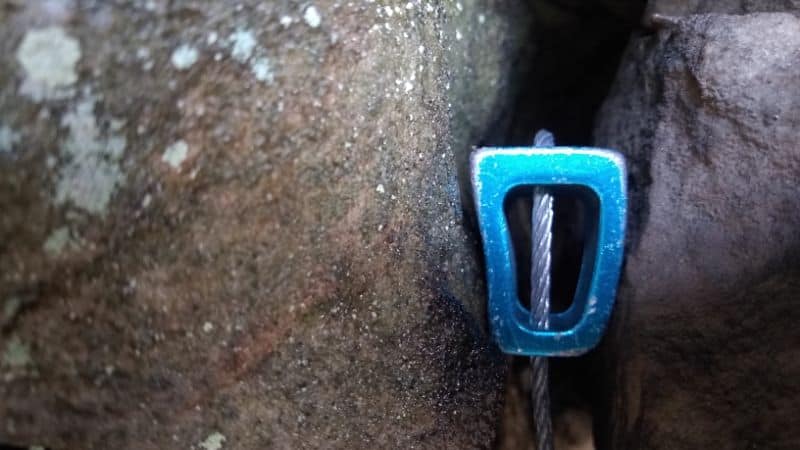
- A 22kN sling cinched around a granite column or horn

It’s somewhat rare for a trad gear placement to count as #5. While many medium- to large pieces of gear are rated for 10-14 kN breaking strength, the rock itself usually isn’t! Rock can be sandy, mossy, friable, brittle, wet, or icy. You could build a 2-point anchor using two #5 placements.
How to Use This Rating System
There you have it! That’s my mental trad gear placement rating systems. Yours may vary, and that’s fine.
Just rate each piece of gear as you place it. Remember what you placed below it, and that will inform you whether you need to double up on placements or keep cruising.
